
Drawing & Traditional Rendering – “Back To Basics” (Work in Progress).
Creative Futures (formerly Craft & Media Technologies) Session 001.
Single 4 Hour intro/recap session ran at Hull School of Art & Design – 28th October 2011.
…
The idea of this aspect of the students Creative Futures (previously Craft & Media Technologies) studio time was to present a set of stand alone mini-sessions, in easy to digest, bite-sized chunks, that could be run together to make one larger ongoing session (as we have here) or used as a fill in micro-sessions elsewhere.
Some of the subsequent sessions/topics we presented under the banner of Creative Futures (which I may post here) included:
Finding/Collecting and Preparing Real World Textures for 3D modelling; Simple Photoshop Colouring; WordPress (using your blog as a hub for your online presence); SketchUp – The Basics, Creating Organic Shapes & Breakdown and Rebuild of existing models; Observational Drawing 001 (Urban Sketching); Developing Level Maps from Sketch to Blocking Out; Character Design (inc. Pareidolia 001); Object & Prop Design (inc. Pareidolia 002); Environment Design; Storyboarding; Concept Art & Presentation; Sound Analysis & Planning (Foley lists); Intro to Blender 3D; Graphic Design as Production Design; Basic Editing in Premier/Animatics; Intro to After Effects & Green Screen; “The Bigger Picture”/Project Management & Project Overviews etc..
This session was given to a mixed group of students undertaking both Animation and Games Design, looking at refreshing some basic drawing principles and the techniques associated with rendering three dimensional objects using pen & paper; hopefully reinforcing and developing a skill set that allows these visual art based students to communicate ideas rapidly and convincingly.
The session adds to thoughts I have discussed previously related to the importance of drawing (not as an end in itself, but as a multi-faceted tool for investigation and observation). Thoughts echoed in the research being done by Jane Tormey and her colleagues.
“I was particularly interested in the value and role given to drawing and how educational ideologies related to the realities of practice. I was fascinated with a number of obvious but apparently contradictory facts:
- The persistent reverence for drawing*, the most primitive of technologies, despite the rapid development of ever more seductive and new technologies.
- The apparent anxiety to maintain this ambiguous ‘centre’, this unifying principle which validates practice and education with little reference to the massive expansion in contemporary drawing applications.
- That in all the recent debate there seemed little articulation of how drawing methods may be relevant, or to the nature of activity and why it was important.”
 …my early lesson plan* showing back to basics drawing …and observational drawing examples.

*Note – not in standard Lesson Plan format (…no kidding eh?)
Though articles like this and archived discussions with creatives like Milton Glaser and Saul Bass would do much to alleviate any worries over the “little articulation” of relevancy; as Tormey herself says:
…drawing is:
“underpinning & essential” [especially in creative work – GS],
“the means of analytical learning”,
“the means to improve perceptions, visual awareness and manual skills”.
“the ultimate transferable skill”
– Jane Tormey (1997) – See also the dialogue Drawing Knowledge – related to her work with TRACEY.
Similarly, the Higher Education Academy (Cardiff*) in there announcement of their Interdisciplinary Learning Through Drawing’: Seminar and exhibition state:
“Drawing practice has long been acknowledged as a cognitive tool. Uniquely placed in creative terms, it offers a diversity of approaches through which innovative ideas and relatively distinct disciplines can be examined. It is surprising therefore, how little research exists which examines possibilities and potentialities in the relation between drawing and specific teaching methodologies”
*Cardiff School of Art and Design are in the process of establishing a centre which aims to focus on the capacity of drawing practice and theory to act as a fundamental driving force in the activity of research.
After all drawing is not just about pretty pictures…

…
This particular “Drawing (Back to Basics)” session began with a discussion on the value of being able to render even in simplistic form, ideas and concepts on paper by hand…
Many artists discuss this idea, there are plenty of books on the subject of drawing (some pictured below), whether covering the basics and fundamentals or more complex discussions of the refinement of drawings and The Design Process via drawing. It’s worth looking at more than one.
Drawn to Life – Walt Stanchfield (Vols 1 & 2); Dynamic Anatomy – Burne Hogarth (this is the book that turned around my understanding of the level I was drawing at); Classical Drawing Atelier – Juliette Aristides; and the (curiously word-count light but profoundly affecting) The Bird King by Shaun Tan are just a hand full of books that discuss drawing that I would personally recommend. But look and ask around; ask your tutors or someone who draws, who you admire, ask what they have looked at. You might be surprised.
 …books above include: The Skillful Huntsman – Robertson, Yamada, Le & Yoon; Mechanica – Doug Chiang; The Bill Sienkiewicz Sketchbook; Drawn To Life – Walter Stanchfield; and centre, Shaun Tan’s The Bird King.


Of course all the drawing books in the world will do the student no good if they are not willing to commit to the act of learning (and of course failing, which is a fundamental part of the learning process) then they are going to struggle with the never ending road that learning to draw sets them upon.
Tom McHenry, in his utterly fantastic blog post on his regime of drawing daily to improve, says that it has allowed him to look back at a body of work and see his development,
“I can enjoy incremental progress toward a goal that may not exist”,
i.e. this elusive myth of ever “being good enough at drawing” …Trust me, there is no such thing, there is always something more to learn.
“A couple thousand pages of work will teach you an awful lot about the artist you actually are vs. the artist you started out wanting to be.” McHenry said via his twitter feed, “The only drawback to all that is that I have lost much of my ability to sympathize with people who “can’t find the time to draw.”” – As Paul Madonna noted in his excellent (and quite beautiful) book – “Everything Is It’s Own Reward” – it’s “always the same excuses; time; money; space (quote in full in the image below)”.
 Paul Madonna’s – “Everthing is it’s Own Reward” – Click To enlarge – Link to PM’s site in text above.

All that said… And the [unteachable ingredient] “Will” aside… where do we start, or re-start?
…
Drawing (Back to Basics) – traditional rendering of objects 101.
So, to the task in hand…
The development of Skills and techniques to create drawings to render simple images for “forthright communication” (as Saul Bass might put it…) and then, along the way, how we might begin to understand the difference between Finished Illustration (or “ART”) and Drawing as Design Development…
…
This “design development” aspect of drawing is what we will be looking at here.
Milton Glaser, designer said in interview –
“Basically the act of drawing has nothing to do with being an illustrator. We draw because it enables us to see. The act of drawing is perhaps the only time you pay attention to what is in front of you. […] Drawing is the path to observation and attentiveness.“
With that in mind it is impossible to ignore the value of, or dismiss “drawing from observation” as having a core role within the training AND education of the designer/creative.
As Walt Stanchfield said:
“Carry a sketchbook… draw constantly… Let your your sketchbook take preference over your camera. You’ll find yourself looking and seeing more than ever before. You will find yourself searching out new things to see, new places to visit and more varieties of people to capture in your sketchbook – your ever growing sketchbook.”
– see p34 of Drawn to Life Vol 1, paragraph 2.
Drawing from life: for example Urban Sketching…


and Life Drawing… (see also >THIS<)

Beneath the surface of the observed drawing, however there are some basic mechanics: most related to fooling the observers eye regarding 3D or (for you animators) Solid Drawing.
Here we will look at some practical drawing and rendering techniques related to the creation of this “suspension of disbelief” if you will regarding the rendering of 3 dimensional forms on a 2 dimensional plane (paper, the digital screen).
…
We will begin by looking at Basic Primitives as the building blocks of imaginative/design development drawing (as they are in 3D animation) and then moving on to conceptually differentiating between flat planes and three dimensional forms and how to create and maintain this “illusion” on paper.
…
a – Rendering Basic Primitives: First, what do we mean by basic primitives?


Well… the simplest geometric shapes – Spheres, Cubes, Extruded Cubes, Cylinders, Cones, Pyramids, and Torus (i.e. Doughnut Shapes); all shapes that appear as the given basic building blocks in many 3D modelling programs used for Games Design and Animation (see this advice on the front page of KarmaToons for example).
 the CAD primitives above are from the free 3D software Blender…
Almost every shape or complex form you will render with a pen or pencil can be derived from these shapes or a combination of these shapes so it is in your interests to master the drawing of them (by mastery we mean the ability to render these shapes using simple perspective drawing and shading and contour line techniques to create the illusion of form).
A wastepaper basket is simply a truncated (cut down) cone, as is a clock, an ashtray or dog-bowl…

Have a little fun with the objects. Try drawing them in different ways, at different rotations, with different lighting, making them sit on the ground/a plane, and making them float.
 The drawing of these simple shapes in doodle form in your sketchbook can be a great warm up exercise for drawing more complex images, you can do these exercises anywhere, doodle them out while chatting on the phone, on the bus, maybe fill a sketchbook page with them every now and again.

Activity 1 – finding out what level the students are at, by setting them a quick task i.e. drawing basic primitives in sketchbooks or on paper, in isolation and in combination – 15/20 mins.
…
b – Spheres and Circles:
One of the hardest concepts to crack when beginning to draw/illustrate and visualise 3D imagery is the creation and maintenance of the illusion of three dimensional objects and forms (your drawings/images) on a two dimensional plane (the paper/digital art board).
Most beginners draw conceptually “flat” on the page, their concept of their image existing only on the plane of the surface of the paper like fuzzy felts, or creating a flattened drawing with coat hanger wire – or for you geometery whizzes and 3D model builders, in the the x (red) and y (blue) axis* if you will, with no z (green) axis
(*In analytic geometry, unknown or generic coordinates are often denoted by the letters x and y on the plane, and x, y, and z in three-dimensional space).

The real trick is to be able to conceptually visualise a third dimension beyond the flat surface of the paper, or… as Roland Barthes (who said “A photograph is always invisible, it is not it that we see”) might have it, try to forget the reality of the surface plane of the paper, work on the image only in whatever plane that exists in within its own reality.
…
I usually start the session by drawing two circles on a Flip Chart and telling the students that one of them is a sphere, the other a flat plane… then asking them, “Which is which?” and more importantly…
“How do I know?”

Well, after about a minute of murmur tinged unresponsiveness, the answer usually comes back “…because you say so?”
And yes, that’s the right answer… because I have made that decision.
In my mind I’ve conceptualised the following…
So, now that we have conceptualised the differences between the two, how can we show this?
How can we make our sphere look 3 dimensional?
Throwing this question out to the floor… we usually get the answer back – “Shading!”
Yes – Shading.
The conceptualisation of a fixed/constant light source (in our drawing) such as the the sun or a light bulb which allows us to predict the fixed fall of light upon an object.
Even in its most basic rendering, whether the shadow is shown on the object or on the plane upon which it rests, it will usually give an illusion of 3 dimensionality, like below…

Alternatively, we can try to use lines upon the “surface” of the object themselves to describe its shape.

Say for example we are to visualise a Globe and a Table-tennis Bat…
Here you can see those contour lines drawn upon the shape we wish to appear as a sphere, and flat lines running across the surface of the bat…

…object A , lines that follow the illusory shape of the object in a curve.
Much like the lines of latitude and longitude found upon a globe.
Whereas on the flat plane of object B, the lines simply follow a straight trajectory across the surface of the object.
The following exercise will show you how, by simply constructing lines upon your circle that follow the shape of the spherical object you wish to depict, you are able to create a fairly complex and convincing image of a three dimensional form.
Activity 2 – showing the form of a sphere by drawing contour lines on its surface, and then using those lines to “remove a segment” revealing this 3D object’s interior.
First draw your circle… Then dot a line describing a curve upon its surface tightening the curve at the points where they meet the circumference of your circle, imagining all the time you are drawing upon the surface of a ball [1], then continue this dotted line “around the back” of the ball [2], back to the point where you started, creating an elliptical construction line that bisects your “sphere”.

Already you can see that this gives form to your simple circle drawing. Repeat the process at an angle to the first ellipse [3 & 4] and then join two of the opposing intersections of your dotted line [5].
Then black line these selected construction lines [6] perhaps using a thicker nibbed-pen and black line part of the “sphere”s circumference.
The opposite shape can be rendered also should your require both shapes. ..and voila, a three dimensional object, created with simple construction lines.
 This shape could be used as the basis for a cutaway image of the world, designed to show the inner core (see sketch below), a dissection of an eye, a water melon with a slice removed etc.

This contour line method of exploring 3D objects can be used with numerous, more complex forms, as can the method of cutting and removing segments – We will look at this later in part – g.
…
d – Drawing Cubes using Basic Two Point Perspective: In order to master the rendering of simple objects and complex combinations of objects in 3D on the page, no technique will be more fundamental than ability to render a box or cube in simple two-point perspective.
Leonardo da Vinci notes in one of his day books (no doubt as a result of Andrea Verrocchio’s teaching) that:
“Practice must always be founded on sound theory, and to this Perspective is the guide and the gateway; and without this nothing can be done well in the matter of drawing.”
This exercise can be as simple or as elaborate as you want to make it.
Cubes A – The simple Cube.
Scott Robertson – the author and practitioner behind the excellent Blast! and (along with Thomas Bertling) of How To Draw (Drawing and Sketching Objects From Your Imagination) and the tutor of the students whose work fills The Skillful Huntsman – offers the idea that in order to practice both ones grasp of perspective, and the development of an eye for drawing straight lines, the humble box in one-point perspective is ample enough (p 15 of How To Draw…).
Here I use a simple two point perspective set up to render a box mechanically, then I try one without the construction lines.

Activity 3 – Suggest the student draws a cube freehand (A). Then to compare, suggest they draw a second (B) using Construction Lines leading back to two Vanishing Points (V.P.) on a Horizon Line. The third cube (C) is drawn from below by moving the construction lines above the Horizon Line.
This activity can run as long as necessary; those students who do this with confidence could be asked to keep adding cubes using the construction lines, scattering them about the space, standing them on top of each other, playing with scale etc.
You may notice that with the vanishing points “in the scene” as it where, you get a little distortion or Fish Eye lens effect creeping in, well as Dylan Teague points out HERE, the best way to avoid that is to make sure your VP’s are beyond the target borders of your proposed image…
Cubes B – The Factory Street Scene. (yet to be added)
Cubes C – The Table and Boxes. Taking the box, and adding additional details such as folded lids, legs (which are just extended cubes), you can begin to form basic composite objects.
Add some of your other basic primitives to the scene.

This ability to render boxes and cubes and composite shapes will not only allow you to create realistic visualisations of scenes and settings for your designs…


But this rendering of compositions made from combinations of cubes will also allow you to develop other rendering techniques such as the following; “crating” and “cookie cutting”.
…
e – “Crating” Objects: Mastering the previous exercises, drawing boxes in perspective at various angles allows you to perform the following process.
When creating images of complex shapes such as the motorbike below, divide the task into smaller items than can be “Boxed” or “Crated up” (see the back wheel below).
If you can draw a box in perspective then you can draw a wheel in the same way.

The hardest part of this type of drawing is identifying positions of atypically visualised constants such as the centre of the circle, in order to mark in the axle points for example (See text and diagrams in red in the visual above, then re do the exercise for the wheel boxed in green).
You can see the process in practice below.

f – Using “Cookie Cutter” Construction Lines:
Here we use the construction line information of one object placed withing the same physical space as another to give us the visual information necessary to render an absence of solid form…
Below you can see an extruded cube (rectangle) with a cylinder placed within it, in order to “cookie cut” a segment from the whole. 

Andrew Kim’s college exercise in drawing combinations of basic primitives or basic forms can be found half way down the page HERE: Its and interesting exercise to try.
g – Creating Organic Forms with Construction Lines:
Here we look at an extension of the exercise in which we drew the sphere and removed a segment.
Looking at adding contour lines on a object to show its form. This work in a similar way to the visualised, wireframe imagery that shows the topography of 3D digital models. Examples [1], [2].

Try drawing a simple curved shape and then adding lines across the surface of the shape to denote the rise and fall of the surface of the object… the simple examples below could act as a starting point, for the more confidents amongst you you could combine the Crating techniques with this and try to create a car or other vehicle form… or perhaps a human head.


h – Dissecting Objects:
Related to the technique above is the use of these contour lines to allow us to begin dividing and dissecting objects and drawing “exploded” versions of simple and complex objects…

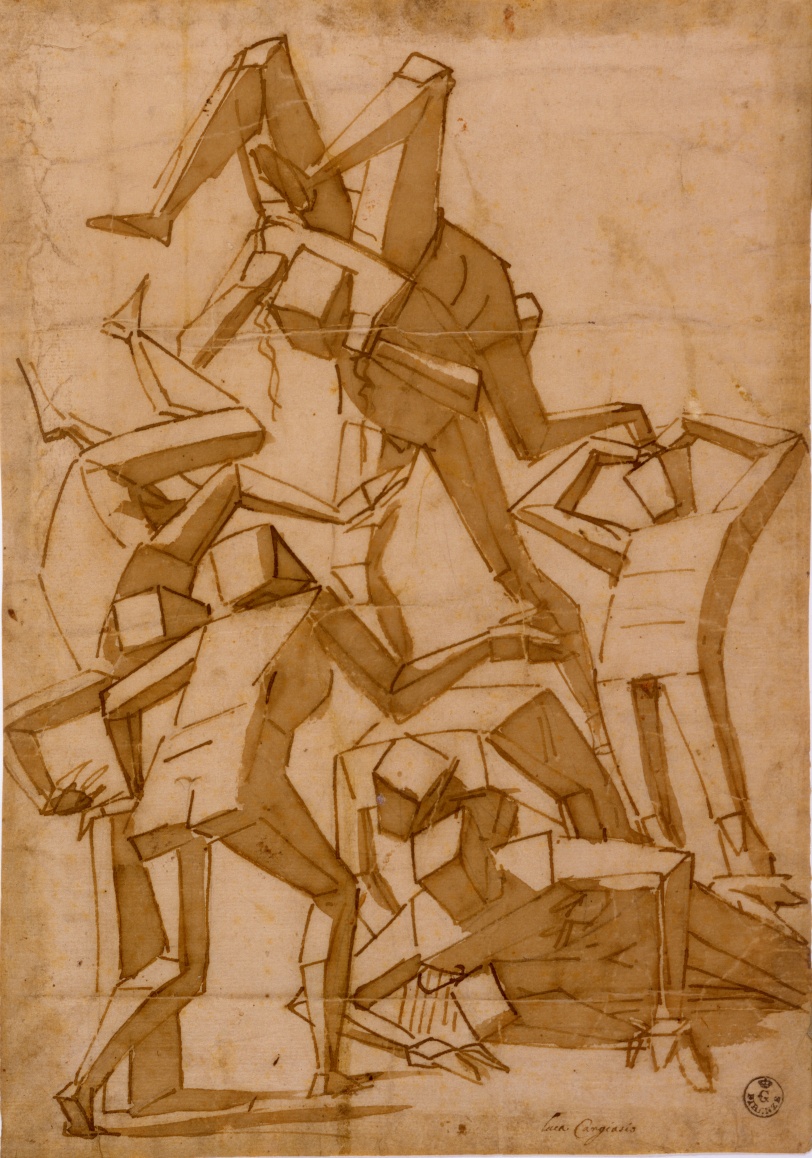
i – Assembling combinations of the above to create Complex Shapes:
As discussed above, it is possible to combine the techniques looked at above in order to render much more complex forms.


See this example from Luca Cambiaso (16th C.)
j – Light & Shade:
k – Thin Line/Thick Line: 
…
A great place to practice many of these techniques would be in your Sketchbook or Daybook… if you are worried about your drawing, try keeping a secret sketchbook, something just for you. You don’t need to show anyone your progress until you are ready, and you see that just fifteen minutes a day will make a noticeable difference – You will spend more time on the toilet!
…
Part two of this double seminar can be found here – Drawing & Traditional Rendering 2 – inc Pareidolia


![[1]](http://i.imgur.com/Scp3M.jpg)
![[2].](http://m1.behance.net/rendition/modules/49976685/disp/951c6f80cccbae68c2d985922827ac1a.JPG)
[…] I’ve experimented in sessions related to the early process of teaching students drawing, a bas… if you will, will a holistic approach, discussing not only what to draw and how to see, but why drawing (and pattern recognition) is important to us as human animals, why we are able to recognise simulacra for actual objects in the art we create and how to relate to the 2D plane of the paper when drawing… […]
Choosing example topics to visualise – Example 1a – “Improving Your Drawing” – Masters Degree « apophenia inc. said this on January 22, 2013 at 7:54 pm |
[…] To give an added sense of 3D I use (for want of a better name) a thin line/thick line technique which I teach my students that Product Designers sometimes use (see an example HERE from my Drawing Basics Post). […]
Developing a Studio Based Visual Mnemonic for Games Design Students – 001a – Creating the Visuals | apophenia inc. said this on July 23, 2013 at 3:08 pm |
[…] also understand, because I personally place a great deal of stock in the design process and drawing, having a background in illustration and production design. But as beautiful and interesting as […]
Masters Degree Study – Module 5 – Precis, “Works Exhibited” | apophenia inc. said this on August 19, 2013 at 12:33 pm |
[…] People have lost the motivation to draw because drawing seems unrelated to their vocational life. Drawing is the path to observation and attentiveness, Technology makes old standards irrelevant and creates its own […]
“Creativity & Creating a Personal Micro Culture” – A session for students. | apophenia inc. said this on October 25, 2013 at 9:14 am |
[…] Skill sets – Solid Drawing (including but not limited to: perspective drawing, rendering 3D imagery). […]
Production Design for Entertainment Media 101 – pt 1 | apophenia inc. said this on November 6, 2013 at 9:24 am |
[…] This brief is also ideal for recapping and showing the students the value of earlier sessions looking at perspective drawing and the use of basic primitive shapes as the basis f…. […]
“Their Pride & Joy…” – Exploration and Development of a Simple Brief – Pt. 1 | apophenia inc. said this on January 6, 2014 at 5:32 pm |
[…] a few pages showing basic mastery of techniques previously looked at, including one, two and three-point perspective, and perhaps “crating” – these might […]
Interior/Exterior – Environment Drawing Mini-Brief. | apophenia inc. said this on March 20, 2014 at 6:54 pm |
[…] discussed in previous sessions […]
Drawing the Human Figure from the Imagination. | apophenia inc. said this on March 21, 2014 at 12:13 pm |
[…] This session was taught as part of Year 1 – Games Design and the second of two sessions looking at the basics (and importance of) of drawing relating to design development for games and animation (and other entertainment media) – The prior session notes can be found here – Drawing & Traditional Rendering – “Back To Basics” (Work in Progress). […]
Drawing & Traditional Rendering 2 – inc “Pareidolia” (Work in Progress). | apophenia inc. said this on October 2, 2014 at 4:36 pm |